Dave Chislett
by Nick · Published · Updated
Dave Chislett's Fire or Heatproof Screed Pizza Oven
First I have to start by thanking Dave Chislett, for letting me share the pizza oven he built on my website. I have got a huge amount of inspiration from his build and I hope you do as well. During Dave’s build we exchanged several emails, and I enjoyed watching his oven progress.
So why am I excited about this build? Well he has built the oven in the same way as I was going to build my next one, and answered all those questions I was asking myself. Questions like:
- Could I use a paving slab as the base, and would it handle the heat?
- Could I use quarry tiles for the base, and would they handle the heat?
- Rather than using clay or bricks for the core oven, what about using fire or heatproof screed. So the same stuff the bricks are made of, but you use it like clay to mould the shape.
- For the insulation could I use the vermiculite & cement mix I used for the base on the previous oven?
- Could I form a chimney with the above to save buying a chimney
So read on if you want hear the answers to these questions and see how Dave built his oven. Also the following article is crammed with interesting facts about its performance.
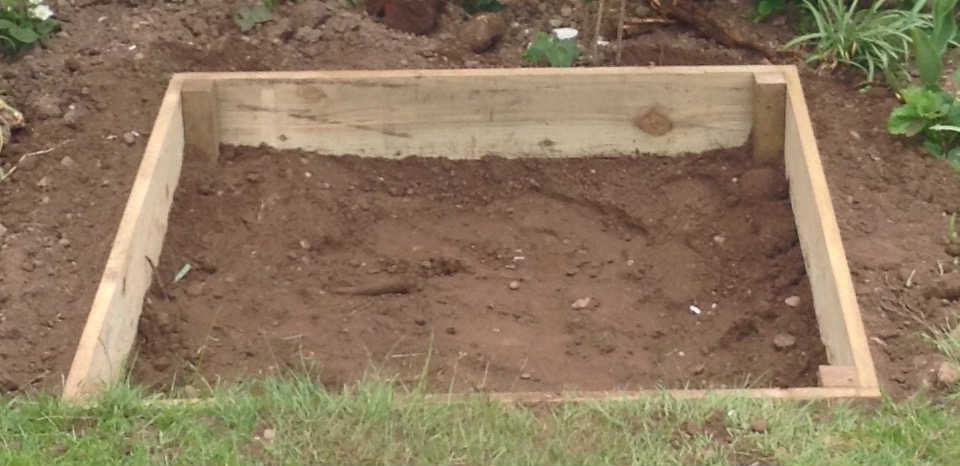
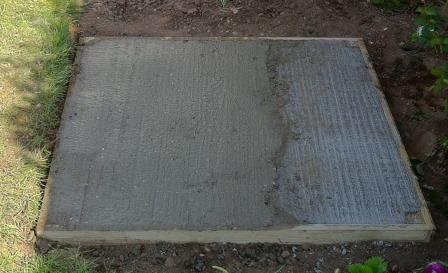
Dave started by digging a 1m by 1m hole with a tanalized timber frame using 22mm by 100mm wood. These were screwed together with short poles as anchors. This was then filled with hand mixed concrete, using a mix of 3 parts ballast, 2 parts building sand and 1 part cement.
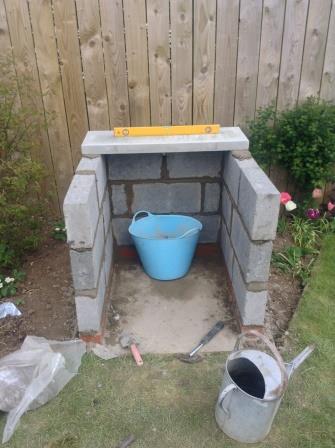
For the Plinth design Dave started by telling me had never done bricklaying before, so wanted a really easy, low skill build.
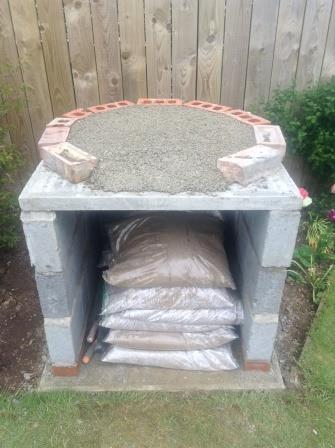
He built the plinth by using a layer of engineering bricks, damp proof membrane, 3 layers of breeze blocks and top of that he put two cheap council concrete slabs to get a base size of 900mm by 900mm. The actual size of the slabs were 900mm by 300mm and 900mm by 600mm. If you are worried about using these slabs, concrete is said to be structurally sound up to 100C, possibly 300C. The most it has reached on his build is 75C, after about 5 hours of big fires.
A couple of key things to note about the plinth build, first there was no strengthening anywhere. Secondly he left gaps in the mortar uprights on the first and third breeze block layers to aid air circulation around stored wood.
So here we have another person with NO bricklaying skills and look what a fantastic job this amateur has made.
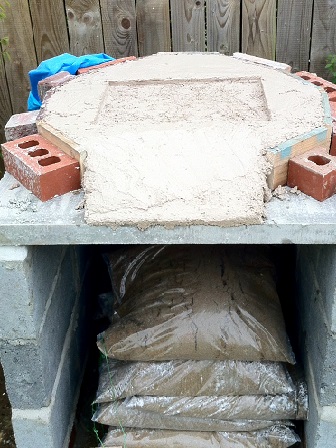
Next Dave decided to insulate the base with the classic vermiculite and concrete mix. He decided to make this the depth of a brick, and used bricks to hold the mixture in. He hand mixed, 5 parts vermiculite from a builders yard, 1 part cement and it took a lot of water. He left this two or three days to go hard before adding the heat resistant screed (ever build 1300C tolerant, also mixed by hand with water). I should also point out that several layers of cooking foil were put between the paving slab and the insulation.
The heat screed was about about 30mm thick, with an inset made of mdf to fit 6 150mm quarry tiles for cooking. Dave said that if he had thought about it he would have polished the screed with an angle grinder and diamond polishing set. Top tip from this section is the mdf inset so the quarry tiles would be flush when fitted later. This is a an idea I will definitely be pinching.
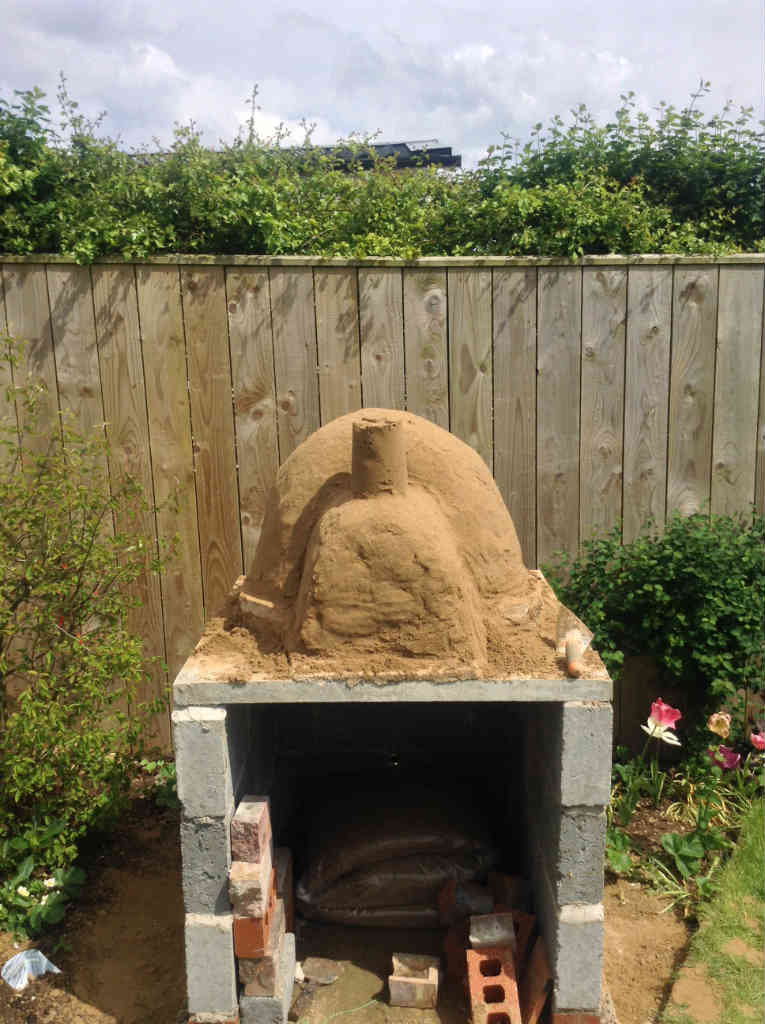
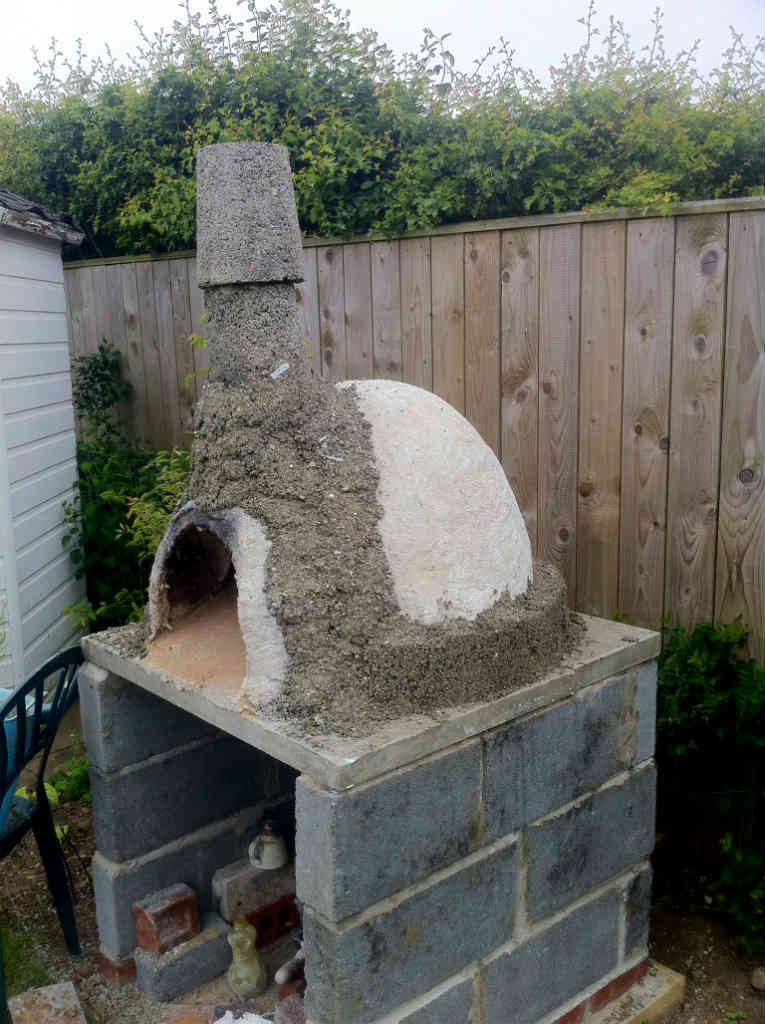
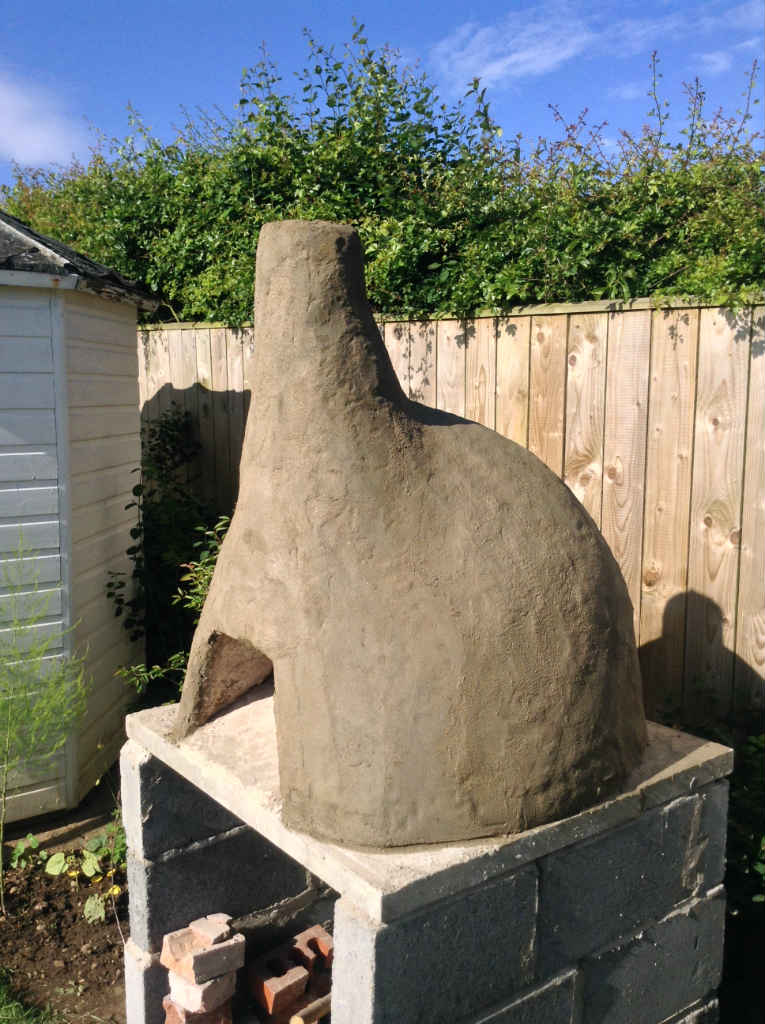
The core oven was built around a Sandcastle mould, and then covered with damp paper. The diameter is so that the heat resistant dome and floor are going to be totally surrounded by insulating concrete. That is, the dome sits ON the floor, not around it. From research, the entry arch/chimney height is close to 60% of the dome height. You have got to love the use of a kids sand castle bucket to form the chimney.
The ‘sandcastle’ is 750mm wide and 430mm high, just because Dave wanted a taller entrance to see the fire! Now this is a good point, for my first oven I had a high dome, but the for the second I went with a lower dome on the assumption that it would heat up quicker. Having done both I prefer the higher one like Dave. Firstly you can see the fire better, but secondly I found it gave better air flow.
Next came the core oven which was made from heat resistant screed. These come in tubs which you mix with water and are resistant to 1300C. These are widely available, Dave getting his from a local merchant, buying 5 x 20Kg tubs, one for the oven floor, four for the rest.

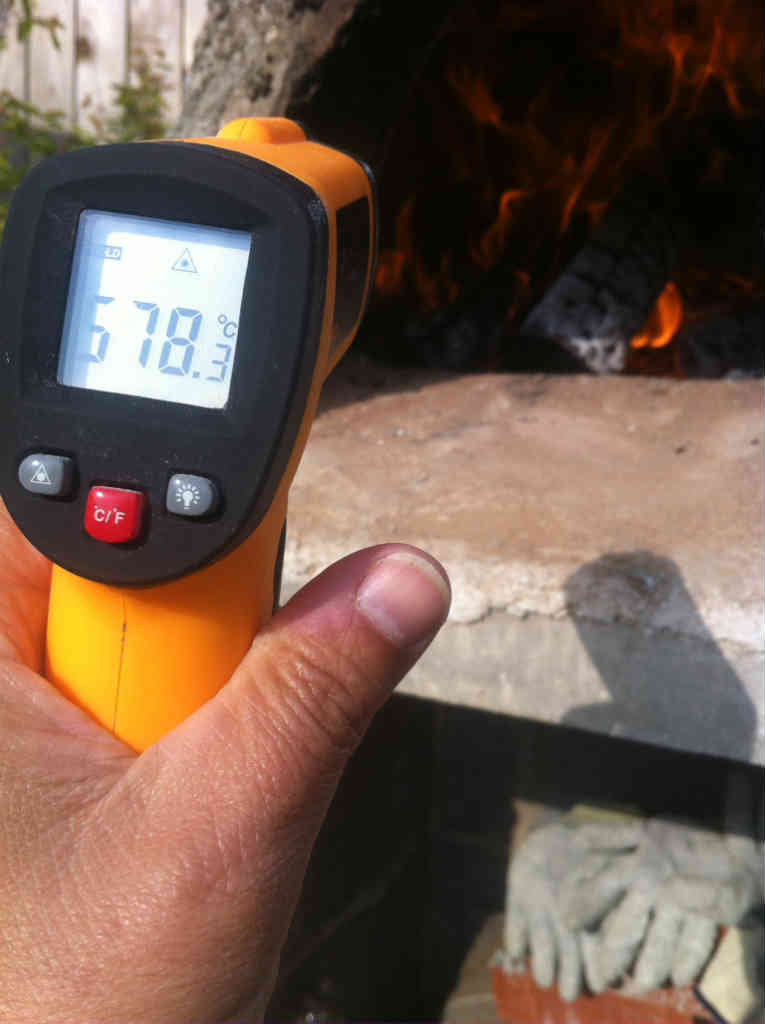
The thickness of the core oven is about 25 mm to 50mm thick, thickest top back. It goes hard without heat after a couple of days, but he did say it was rock hard after 14 hours. When it went hard, he cured it with gentle and then hot fires. It also further cured the floor, and he could hear the base insulation water boiling off

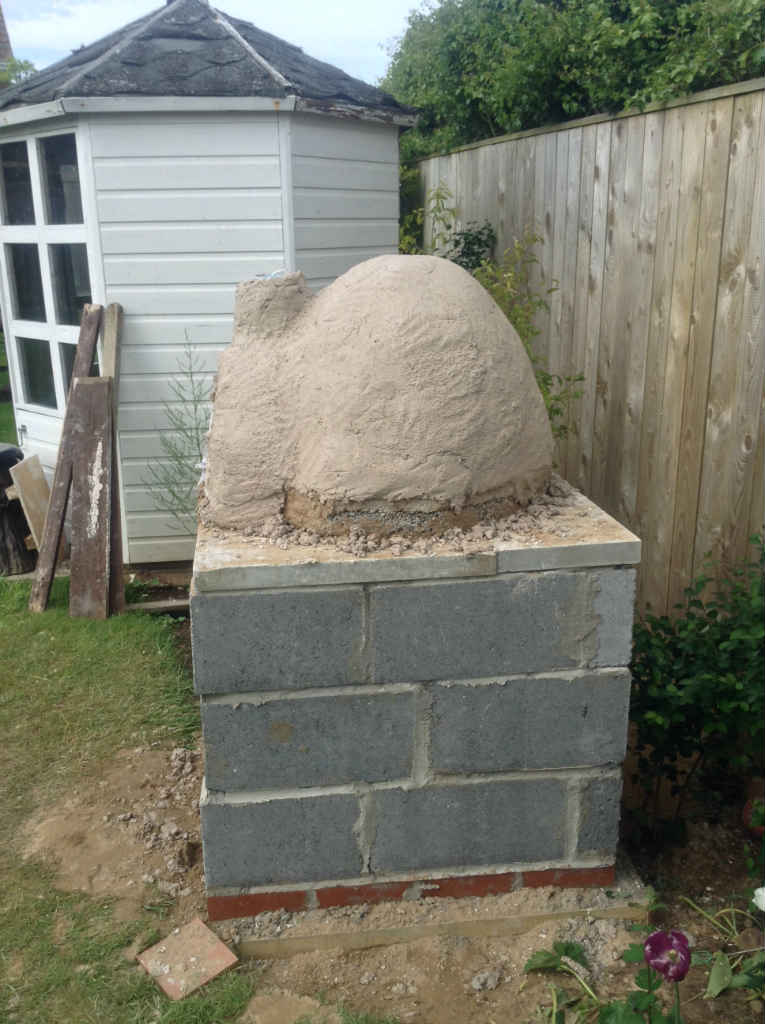
The layer of insulation is the same mix as the bottom. Note he extended the chimney with two vermiculite moulds ( little flower pot inside big flower pot ) and then added the dome insulation. When that was complete, he left it a few days to go hard, then lit increasingly hot fires. He held the inside temperature above 550C for five hours, then let it cool overnight. It steamed lots!
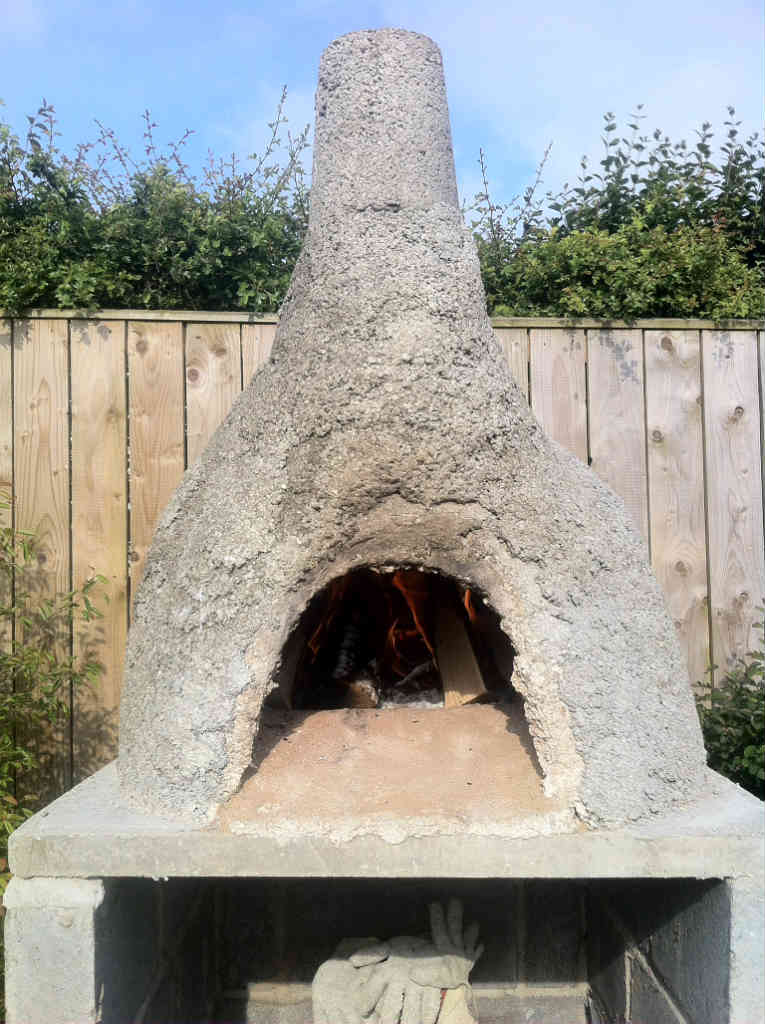
He did a good job with the insulation as in normal cooking firing, the hottest it gets outside is 26C. Very little change from sunlight!
The next day, he lit another fire – no steam! So he added an air curing heat resistant screed (possibly not needed) then a layer of ordinary mortar (5 sand 1 cement mix) and let that cure. At this stage, when fired far hotter than needed for cooking, and for hours, the temperatures were underside of concrete slab, hottest part 75C, hottest outside at the top back 77C
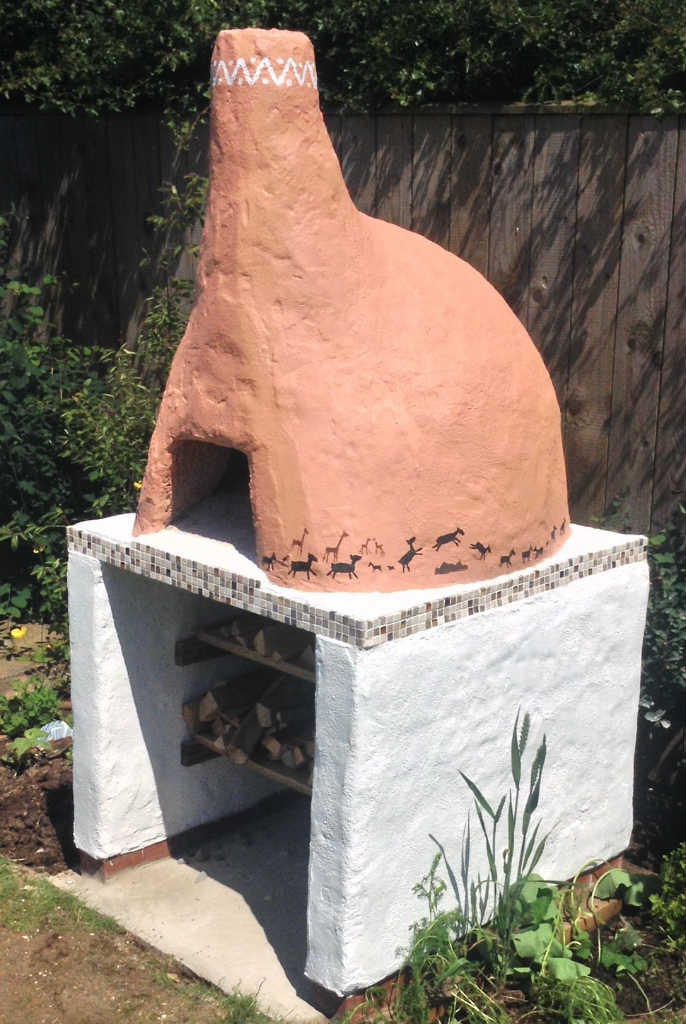
After this, he rendered the breeze blocks, painted the lot, put mosaic tiles round the edges of the concrete slab, then added some artwork. The lid is just a mushroom shape, carved out of a block of vermiculite concrete, which has then been rendered and painted. In the picture on the right you can see the lid on its ‘while cooking pole’. It locates on the pole when cooking, and then the stalk fits in the chimney when done. That stops it blowing off in a storm. The shelves are just rough sawn tanalized timber.
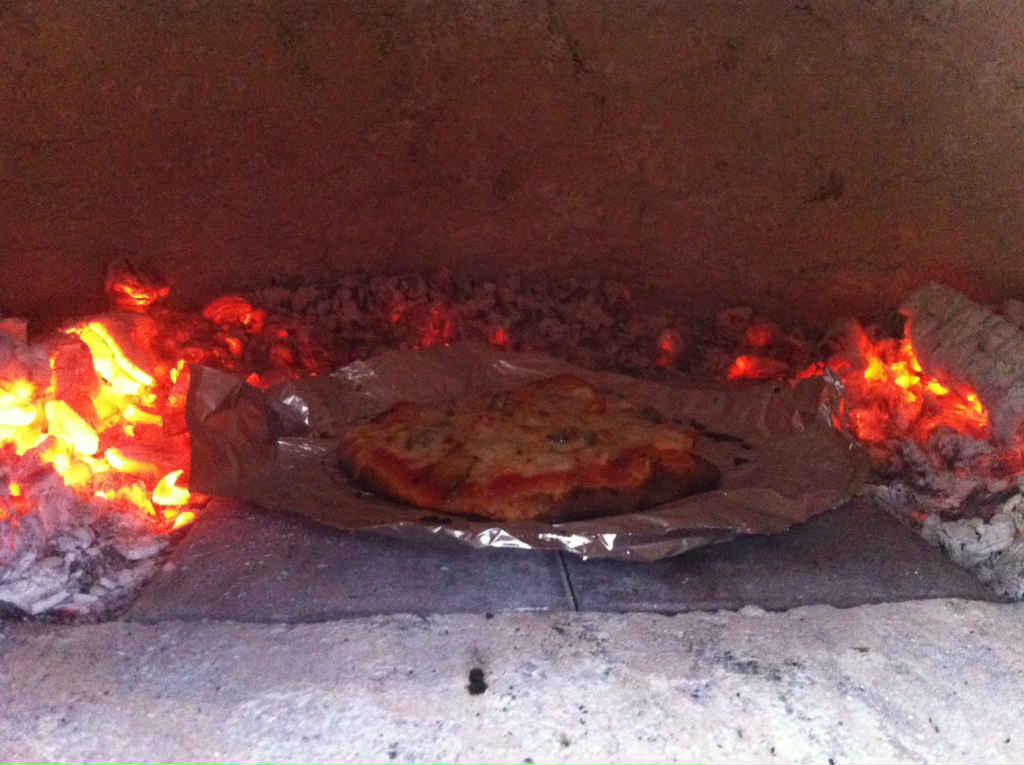
Temperatures for cooking. With a smaller fire, placed at the back and round the corner edges, the wall temperatures go above 350C and the floor cooking area varies from 220C right at the front of the quarry tiles, to 300C at rear edge. Outside, the back part, which is in shade in the evening, doesn’t reach 28C.
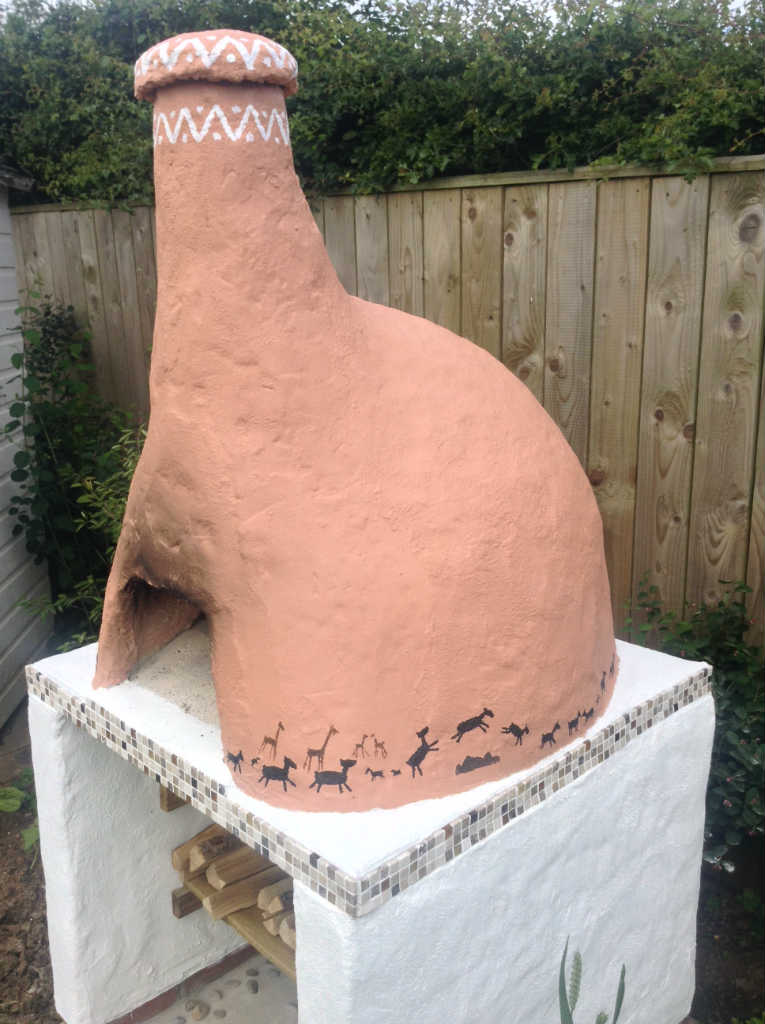
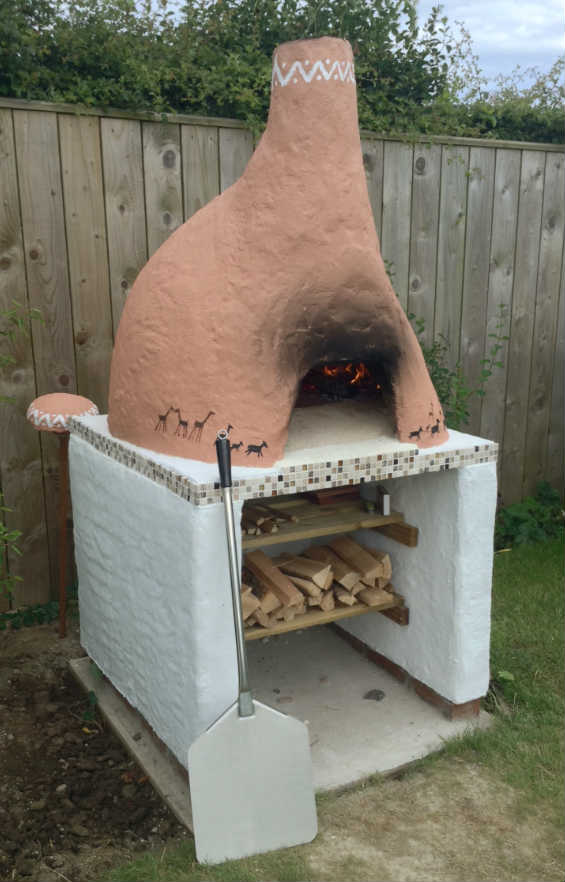
After this, he rendered the breeze blocks, painted the lot, put mosaic tiles round the edges of the concrete slab, then added some artwork. The lid is just a mushroom shape, carved out of a block of vermiculite concrete, which has then been rendered and painted. In the picture on the right you can see the lid on its ‘while cooking pole’. It locates on the pole when cooking, and then the stalk fits in the chimney when done. That stops it blowing off in a storm. The shelves are just rough sawn tanalized timber.
Temperatures for cooking. With a smaller fire, placed at the back and round the corner edges, the wall temperatures go above 350C and the floor cooking area varies from 220C right at the front of the quarry tiles, to 300C at rear edge. Outside, the back part, which is in shade in the evening, doesn’t reach 28C.


Dave says if he was to do this again he would:
1) Have the dome slightly flatter.
2) Design in a door to close the oven behind the chimney – to contain the heat for long slow cooking
3) Get an Angle grinder and diamond pads and polish the floor of the oven.
I love Dave’s first comment because after I built my first oven I said one thing I would do differently is build a flatter dome. Now I have, my next one is going to be higher again.
Dave estimates that the total build cost was about £240, which I think it excellent value. Remember this baby is built to last, and looks good all year round. You can see from the pictures, and the facts he shared that it works perfectly. As for the build, Dave confessed he had never done anything like this, so the same as most people reading this. The difference is he just did it and learnt along the way. As for the big ticket items his time was about ½ day foundations, ½ day plinth, ½ day fireproof igloo.
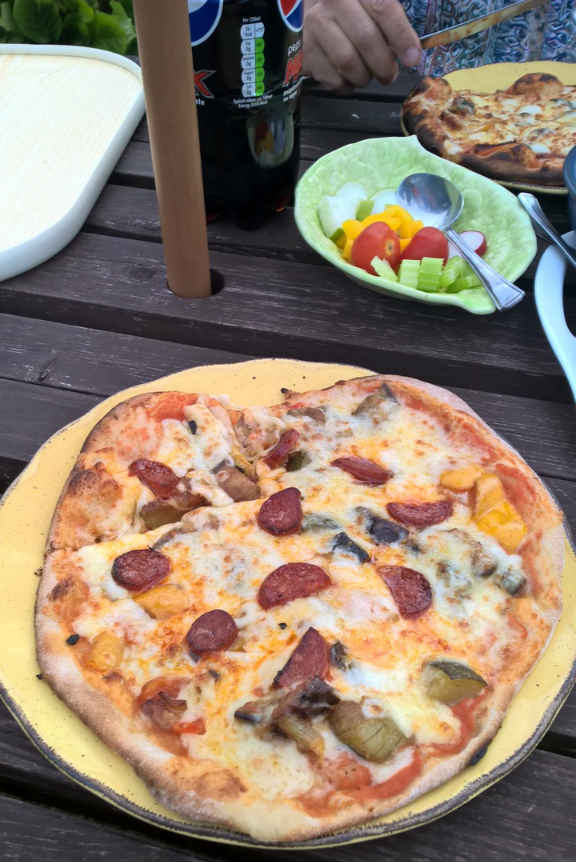
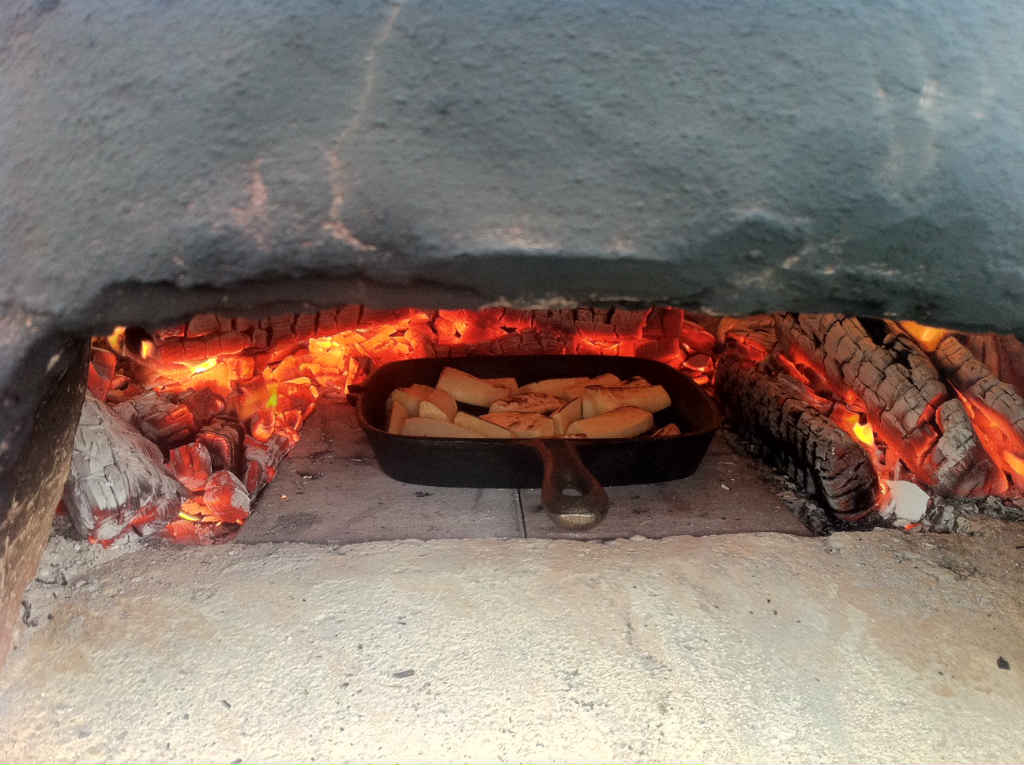
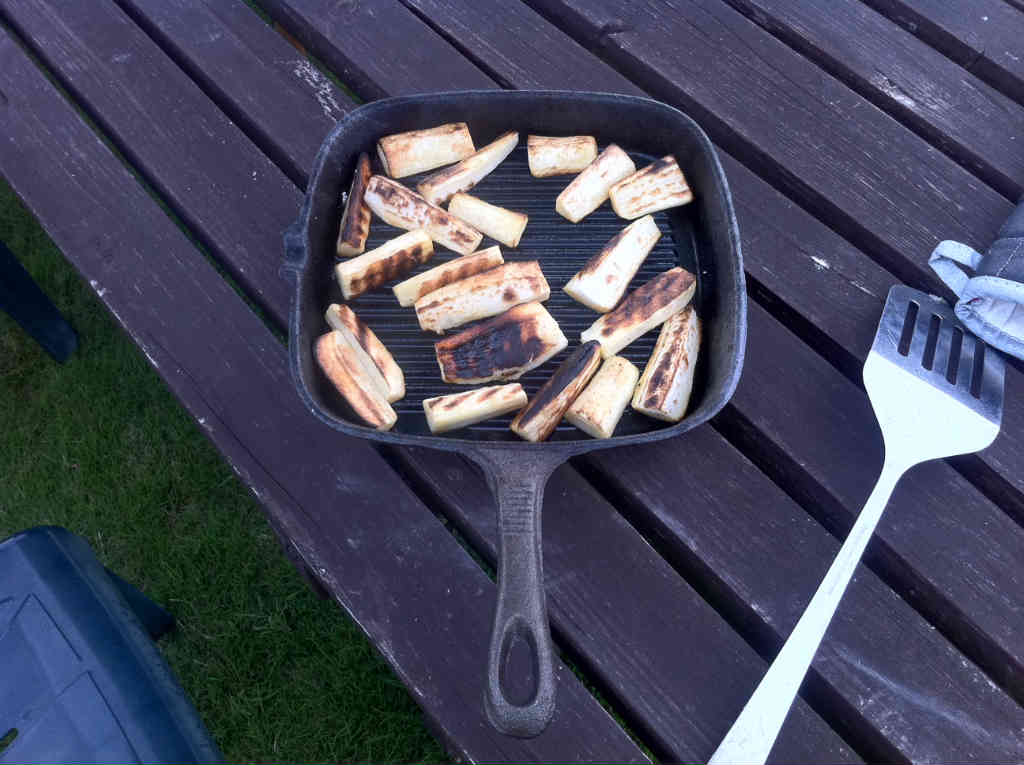
The last I heard from Dave he said he had bought a really heavy cast iron ridged pan to use inside the oven for roasting veg and steak et al. Apparently, Aluminium can melt and enamel is best below 280C. So, cast iron it is! you can see some pictures above of him using it.
If this hasn’t inspired you, then keep looking on the site and pick another oven.
1 Response
[…] oven will be built, that I have not decided yet. I was thinking of doing a heatproof screed like Dave Chislett did featured on your ovens. But I also like the idea of doing something around a rocket […]